Home
My Update Blog
Wiring Closet
Main Controller
RS485 Network
Touchscreens
Plantation Shutters
Lighting & Devices
Audio System
Climate Control
iPhone Detection
Links
Contact Me
Custom Nodes
Multi-Purpose Node
Servo Controller Node
IR Occupancy Counting
Bed Occupancy Node
Old Townhouse
Old Macros and Events
Old Wiring and Design
Old Lighting and Devices
Old Audio Componets
Old Security System
Old iPhone Web Interface


Washington, NC Real Estate - A cool site with real estate information in Washington, Bath, and Belhaven, North Carolina.

Greenville, NC Real Estate - Another real estate site with information for Greenville and Winterville, NC.

Morehead City, NC Real Estate - Another real estate site with information for Atlantic Beach and Emerald Isle, NC.

Jacksonville, NC Real Estate - A real estate site with information for Jacksonville, NC and Richlands, NC and homes for sale.

Wiring Closet

With my old townhouse I was using the spare bedroom walk-in closet to house all of my electronics for my home automation setup. It was pretty small and messy so it made using the closet for what it was actually intended for a hassle. The biggest problem with that setup ended up actually being the heat output generated by the main controller and amplifier. I had to always leave the door cracked or it would get extremely hot in the small space. I toyed with the idea of venting the heat to the attic, but I just never got around to it.

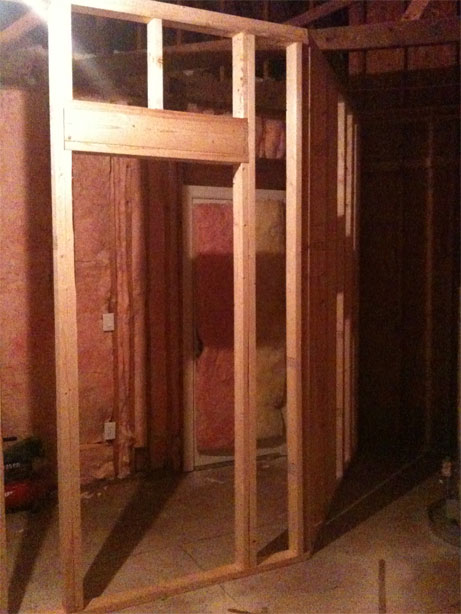
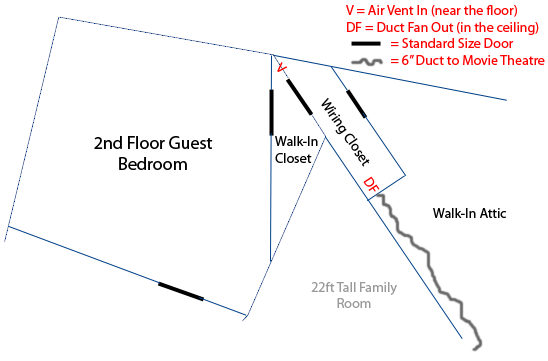
When I moved into my current house I knew that I was going to have to make arrangements right away for the wiring closet. This house actually has three separate walk in attic spaces, the largest of them being big enough to place another whole room in. The family room has 22 foot ceilings throughout (not vaulted, 22ft wall-to-wall!), so it causes the second story of the house to wrap around the family room. Because of this, the largest of the walk in attics is only accessible from the spare bedroom's walk-in closet on the second floor. This closet has a full-sized door that allows you access to the attic.

With some planning, I knew that I could create another room off of this closet and make it my central location for housing the main controller. Because heat was such an issue last time in the old house, I decided that the room needed to be temperature controlled and insulated. So the week after I bought the house I had a 5ft by 14ft room framed, electrical run, dry-walled, and insulated. I purposely left the dry wall off the longest wall so that I could place recessed 42” wiring cans and shelving to house everything.


Temperature Control

I toyed with a bunch of ideas when it came to keeping the new wiring closet at a constant temperature. The first and most obvious idea was to put a wall mount or portable air conditioner in the room and just set the thermostat to regulate the temperature. Now this sounds nice, but it is very impractical. First off, venting an air conditioner in my attic is a very bad idea (from what I read) because of the humidity being exhausted from the room. I'd also have to run a condensation drain to drain the water out. Since the house is brick-veneer, that would not be a very easy task. Even with these things in mind, my biggest reason for not going this route was actually the energy efficiency (or lack there of). I live in Eastern North Carolina, so the summers get extremely hot here. For the hot summer days it makes sense to air condition the room when it gets above a certain temperature, especially since the rest of the house has to be air conditioned anyway. However, we also have a fairly cold winter as well. The idea of the central air heating the rest of the house while I turn on an air conditioner in the attic to cool down a small room is extremely counter-productive. The obvious solution to this seems to be using a fan to blow in the cold air from the outside during the winter, but then that leaves you with a problem of the humidity from the outside air harming your electronics if it gets too high.

After thinking about things and doing my research online I came up with a better and much more practical idea. The electronics in this room don't have to be kept at an ultra-low temperature. Keeping the room somewhere below 85F is perfectly acceptable to most electronics (anything I'm going to use anyway). With this in mind I came up with the idea to cut a small vent at the bottom of the walk-in closet to the new wiring closet. Then I cut a hole in the ceiling at the opposite end of the wiring closet and installed a 6” duct-booster fan (6-Inch 110VAC 250 CFM In-Line Duct Fan). Then a duct out of this was ran though the attic to the open closet of the movie theater on the second story of the house. A thermostat (Columbus Electric 1A22-7 Attic Fan Thermostat) was also mounted on the wall that controls the duct-booster fan.

The theory behind this design is pretty simple. As soon as the room's temperature increased to 85F or higher the duct-booster fan will activate, pulling the hot air out of the room and dumping it into the other side of the house. Because of the suction created by the fan in the wiring closet pulling the hot air out, colder air would be pulled into this room from the directly attached walk-in closet vent of the spare bedroom.

As of December 2010 I have not gone though a summer yet at the new house to make sure everything works exactly as I intend for it to, so I'll keep this page updated next summer when it starts to get warm.

Update October 5th 2011: During the summer there were several days where the room got extremely hot because the duct fan just didn't pull enough air through the room, so I ended up leaving the door open on some days.  I searched around and I ended up buying a Suncourt Inline Centrifugal Fan that fits the 6" duct.  It exhausts 409CFM, so the air is replaced in the control room once every minute and ten seconds.

Update February 12th 2012: I finally got the last wall of the room dry walled around the recessed can and the floor tiled. The equipment rack I ended up choosing is a 19”, two-post Copper B-Line 45U that is 85” tall (Model QZC-SB556084XU). It's bolted right to the floor joists and tiled around.

I also installed an air pressure sensing switch (Cleveland Controls Model AFS-222) that senses air flow from the exhaust fan leaving the room. This switch allows me to know when the fan is running and is connected to a multi-purpose node mounted on the wall in the control room. This node makes sure that the temperature does not exceed a certain set point without the fan tuning on. If it does, I am sent a text message alerting me the fan has not come on. If the temperature continues to rise above a critical set point I have set, the main controller is notified, I am sent a text message, and then it immediately issues commands to safely shutdown the NAS/Media Server, Nuvo Grand Concerto, PoE Switch, and the main controller itself.


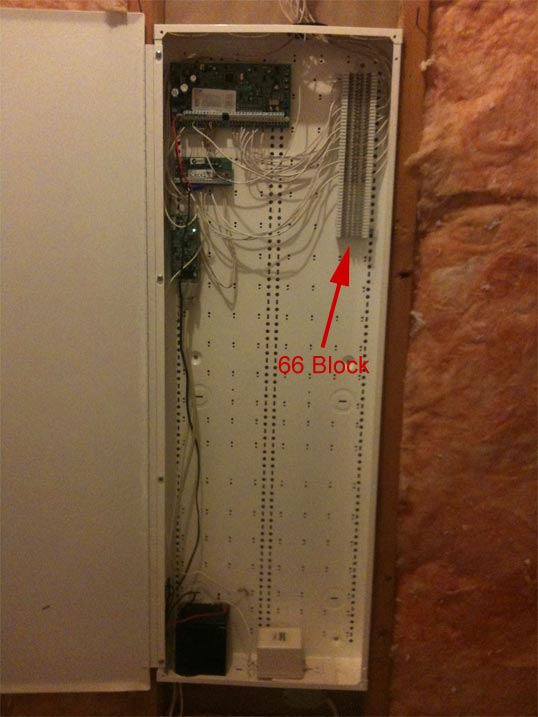
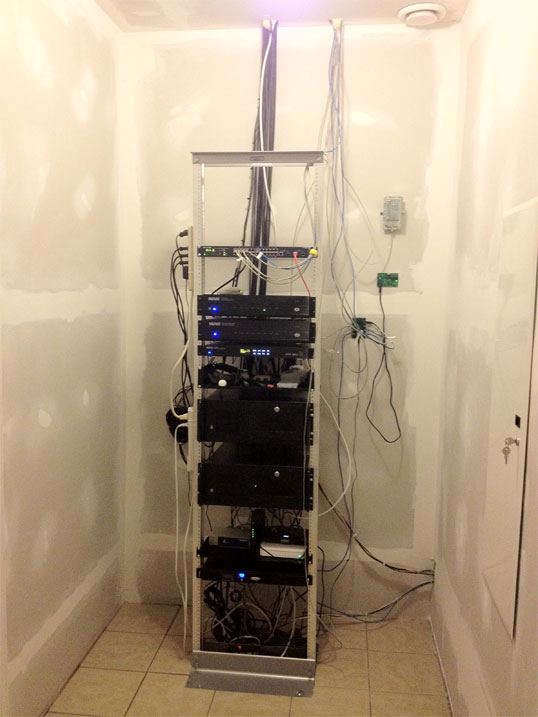
Room with Cooper B-Line Rack bolted to the floor and equipment mounted

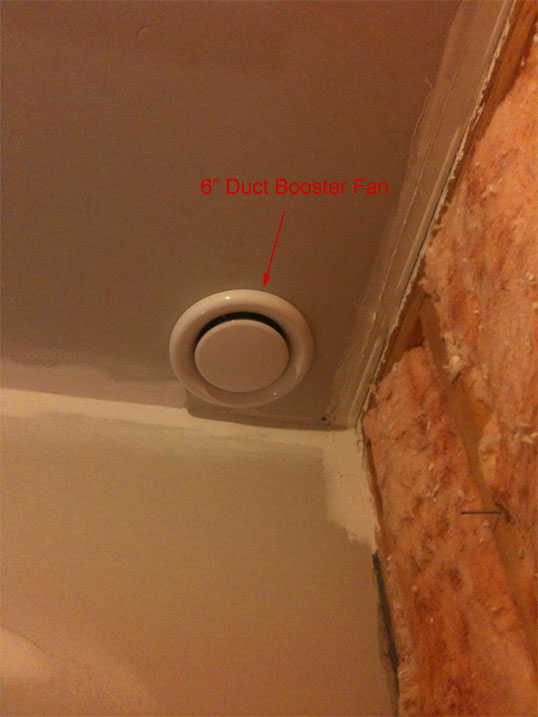
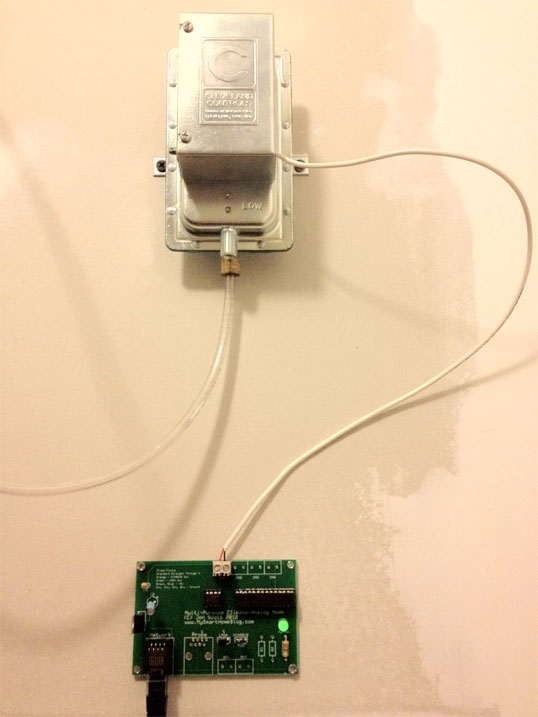
Cleveland Controls AFS-222 Pressure Switch on top mounted to the wall and the wiring closet node below it that monitors temperature, humidity, and switch input.


Room Wiring and Shelving

I'm taking the installation of the recessed structured wiring cabinets and shelving on a need-by-need bases, so I've only installed one recessed cabinet and a 19” equipment rack to date. Eventually I will need more space to install the different modules needed for my system.

I like the idea of the recessed can's because they can be closed and locked for a neat and organized look. Plus, I can drywall this last wall when I finish (if I ever do!) so that it's a complete room.

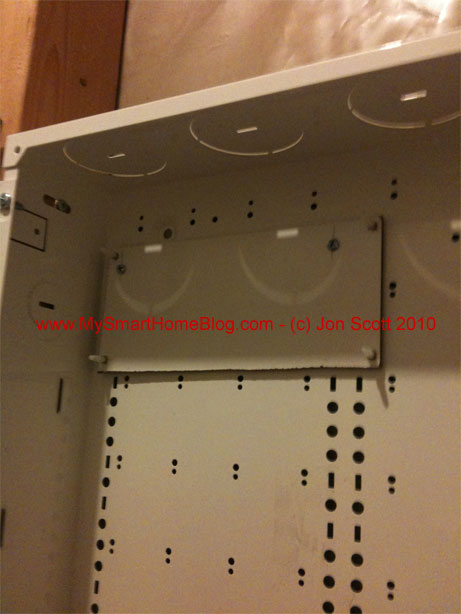
The mounting holes in the cabinets are made for popular On-Q structured wiring modules. This would be great if I had any, but I don't. I planned to actually use the cabinets to hold my security system and other small modules that really were not designed to fit into these cabinets. If you search online you will find that On-Q actually makes some 3rd party adapter plates that are pretty expensive in my opinion. So I decided to make my own out of white press board that I bought from my local hardware store. This board is actually supposed to be used for making large dry erase boards. I cut the size pieces I needed with a hack saw and then I drilled holes into it for my circuit boards to be attached to using plastic standoffs. Then I simply used a screw size that fit the holes in the back of the cabinet to mount the press board.  This saved me a lot of money because I would have had to have a bunch of the 3rd party adapter plates from On-Q to mount everything. So far they are working great! You will also see that I use standard 66 blocks for wire termination in the cabinet as well. This helps keep things organized and prevents me from having to run new wire if I decide to change my layout in the future.


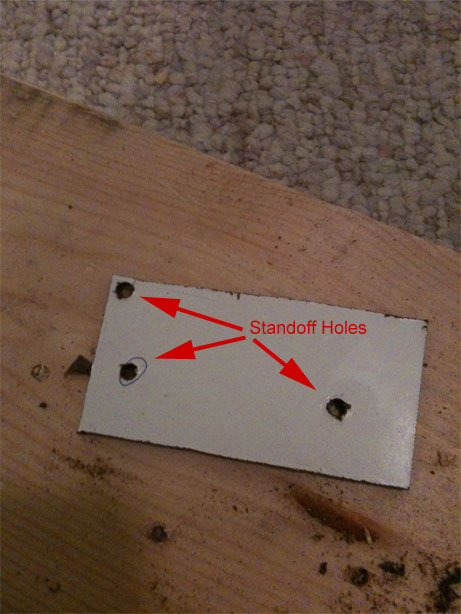
Press board with holes for standoffs drilled

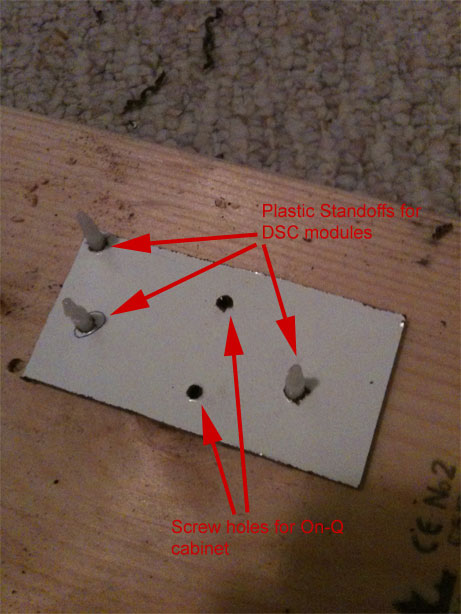
Holes for On-Q cabinet drilled

The 19” two-post rack will hold the whole-house audio amplifier, tuners, main controller, and router.


Room Security

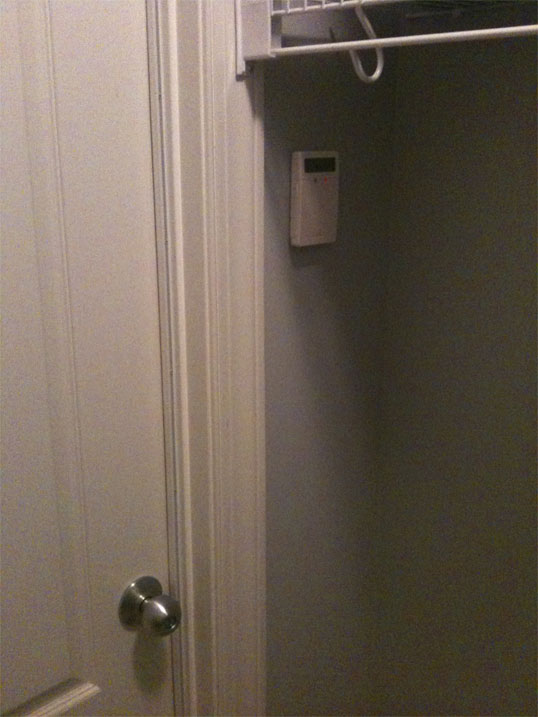
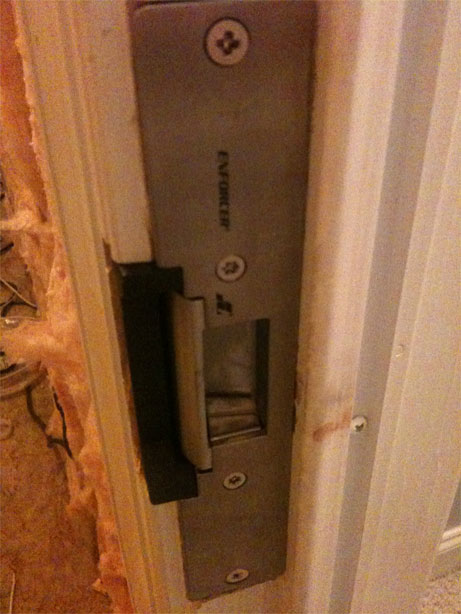
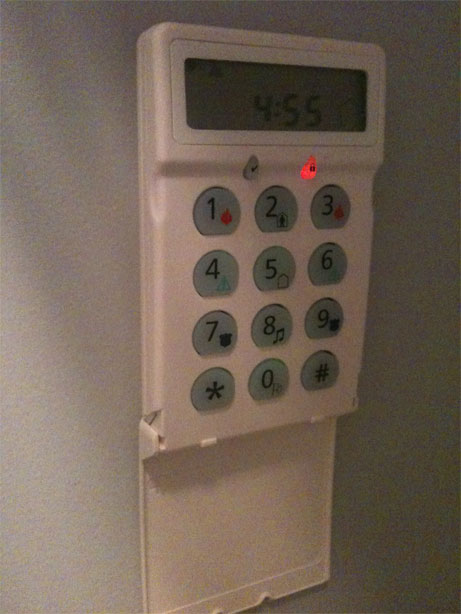
The wiring closet room is actually setup on it's own partition through the DSC Security System that stays armed 24/7. Outside the door in the walk-in closet (see layout above) there is a DSC Icon Series keypad to the right-hand side of the door. This keypad flips open and only controls this partition. The door is equipped with an electronic door strike (Secco-Larm  Enforcer SD-994C for wood doors) that also interfaces with the security system. When the wiring closet partition is unarmed the door strike has power applied to it and stays unlocked since I have it set to fail-secure mode. When the partition is armed the power is removed from the strike and the door is locked. The partition is also set to auto arm 60 seconds after the door shuts and all zones are in ready state so that I don't forget to arm it when I leave the room. This is more of a fun thing to make sure my guests stay out of the room when they are there and to impress my friends with my 'secret room' when I give them a tour :o)


DSC keypad installed in the walk-in closet. Notice the red light meaning room is armed.

Enforcer door strike installed in the door leading into the wiring closet


© Jon Scott 2012 -- All Rights Reserved.