 |
|
|
Washington, NC Real Estate - A cool site with real estate information in Washington, Bath, and Belhaven, North Carolina. Greenville, NC Real Estate - Another real estate site with information for Greenville and Winterville, NC. Morehead City, NC Real Estate - Another real estate site with information for Atlantic Beach and Emerald Isle, NC. Jacksonville, NC Real Estate - A real estate site with information for Jacksonville, NC and Richlands, NC and homes for sale. |
Wiring and DesignMy two-story townhouse was never really designed to make running new wire runs very easy. I live in the eastern part of North Carolina where basements are pretty rare. The foundation is on a cement slab, so that means there is no crawl space either. That means running wires on the first floor of the house is a huge pain. I do however have an attic, so running wires on the second floor is not that big of a problem. That being said, there are certain parts of my home automation system that I knew I had to use a hardwire setup in order to attain the results I wanted for the whole-house audio and security system. The last thing I wanted to do was knock down all of my drywall, drill through all the studs, run the wire runs, replace the drywall, and then repaint the entire downstairs. So I was on a mission to find a simpler way of doing this. 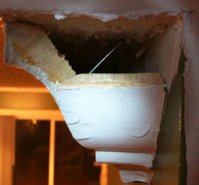 One day while pondering about how to run the speaker wire and motion detectors, I happened to think about the crown molding. My entire house came with fairly-large crown molding that surrounds the top part of the ceiling on both the top and bottom floors. Upon closer examination of the molding, I realized that there just might be a cavity big enough to use it as a wire channel. I pried a corner piece off near the stairs to check and sure enough there is plenty of room behind it. 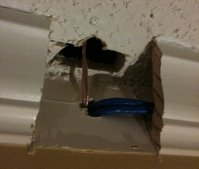 Now, I thought about prying the molding off, running the wire, and then placing it back up on the ceiling, but I was too worried about running a nail through a wire. I would probably never be able to figure out where the nail penetrated the wire unless I pulled all of the molding back off the ceiling again to check. So in order to avoid this, I decided I would run the wire with the crown molding in place. This was a challenge since my house has some very odd-shaped walls and I knew that running a wire snake around these corners was going to be nearly impossible. 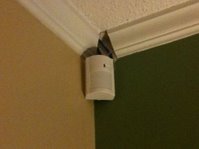 The solution was to take a hack saw and very carefully saw off every corner piece downstairs. This would allow the wire snake to be in a straight line for every run. Once I pulled the wire through one straight section of molding, I would re-thread the snake and run the next section. Then once I ran the wire I would just put the pieces right back in there place with some wood putty, sand it over, and then paint it. 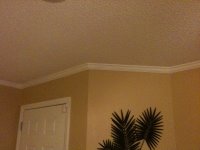 After I placed the pieces back, sanded the wood putty, and painted the trim to match again, I have to say it turned out better than expected. I was able to get all of the wire runs I wanted and I didn't have to destroy my house in the process. I do plan on cutting the wires where they input into the crown molding when I move so there will be no question as to my wiring methods when I sell the house in the future. |
© Jon Scott 2012 -- All Rights Reserved.