 |
|
|
Washington, NC Real Estate - A cool site with real estate information in Washington, Bath, and Belhaven, North Carolina. Greenville, NC Real Estate - Another real estate site with information for Greenville and Winterville, NC. Morehead City, NC Real Estate - Another real estate site with information for Atlantic Beach and Emerald Isle, NC. Jacksonville, NC Real Estate - A real estate site with information for Jacksonville, NC and Richlands, NC and homes for sale. |
Custom In-Wall Touchscreens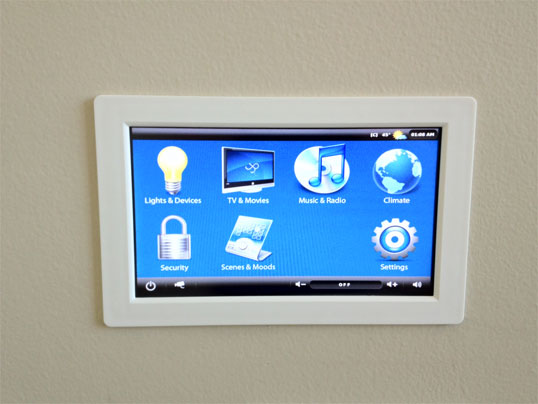 I've always wanted to have touchscreens mounted in the walls of my house that would allow me to control everything. I feel like I've looked at a thousand different options over the years, with some sort of drawback for each one that prevented me from buying it. Most of the time the drawback was the price. Even when I found one that was semi-reasonable, the features I wanted just weren't there. I ended up coming to the conclusion that I just wasn't going to be happy with a touchscreen unless it was run by completely custom software. Right: Touchscreen mounted in the wall (bad picture of the actual screen, see below images)
I ended up settling on a Samsung S3C2440 ARM9 Computer Board that came bundled with a 7" TFT LCD Touchscreen. I've found this package with this particular touchscreen (at a reasonable price) here on eBay. The total price I paid is $159 + $30 shipping for each touchscreen. 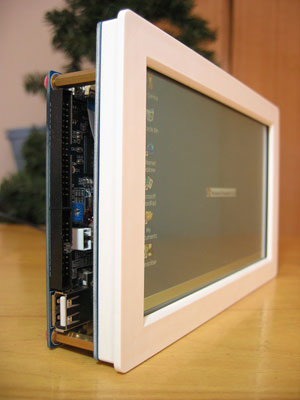 Here are the main features of the board:
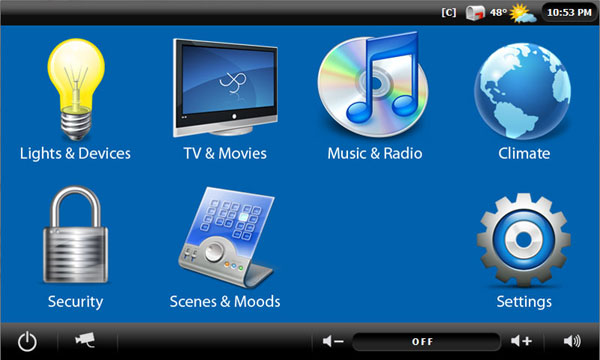
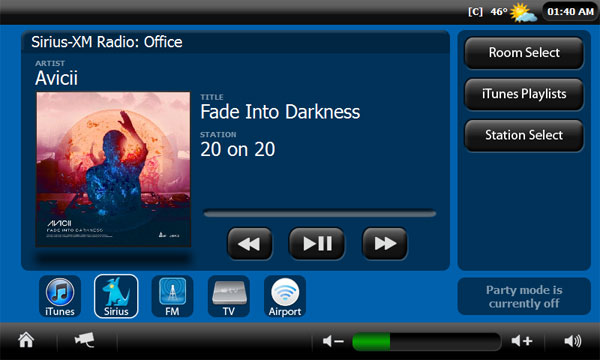
Wall MountingThe board and touchscreen are only about 2.25” deep when you attach them together with the standoffs. The touchscreen itself has a small lip on it that allows you to be able to insert it into a hole in the drywall without being able to see the rough edges you cut. This was the only touchscreen I could find with a lip around the edges. I doubt the touchscreen was intended to be mounted in a wall cavity, but it works well for it. I simply traced the outline onto the drywall using a pencil and (after checking with a stud finder for any obstructions) used a drywall saw to cut out the pattern carefully. So long as the screen and board fit snugly in the hole you made, it won't go anywhere. It can be pulled out if you need to get to it again. The viewing angel of the screen is excellent when viewing from the left or right sides. However, looking down from up above is not the best. Because of this, I have mine mounted 57” from the floor to the bottom of the touchscreen. Powering the Touchscreens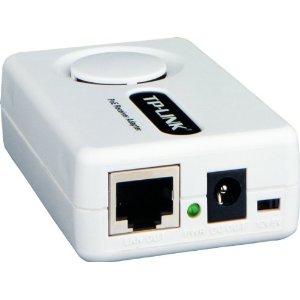 The board and touchscreen run on a 12 volt power adapter. I knew I was already going to have to run ethernet cable to each of the touchscreen locations for them to be able to interact with my main controller and MisterHouse, so I decided to try power over ethernet to power the touchscreen and board. The board itself does not support PoE, so I purchased a TP-Link L-PoE10R PoE Splitter from Amazon that would allow me to split off the power injected by my 24 port PoE switch in my wiring closet. It has the option of outputting 5v or 12v, so it works perfectly for the touchscreen interface. With the touchscreen backlight on and the board running it uses a total of 7 watts according to my switch. With the touchscreen backlight off and just the board running it only uses 2.5 watts. If the house is unoccupied or if the room a touchscreen is located in is unoccupied, the main controller sends a command to power the backlight on the touchscreens affected off. This should help prolong the life of the LED screens for many years. Operating SystemThe board comes with Linux 2.6.32 already installed along with Qtopia as the windows manager. It's nothing special, but it works as a great testing tool. I knew my end result was going to be a standalone application that would start as soon as Linux loaded up, so I didn't mess with Qtopia much besides setting the IP address for the ethernet interface. There is a built in FTP server so you can easily transfer files to and from the device without having to use an SD card. You can also plug a USB keyboard right in on the side of the board if you want to type directly into the shell console. Application FrameworkI am not a programmer by trade, and especially not an object oriented programmer. However, I'm not afraid to get my hands dirty and learn either. I did a lot of research and settled on writing the application in C++ using the Qt (pronounced “cute”) framework as the basis for my touch screen application. Besides the fact that it is open source, I choose Qt because it is completely portable from Windows, Mac, Linux, and embedded devices such as Linux running on the ARM processor. This means that I could write the code on my Windows PC, compile and test it there, then copy it over to my Ubuntu Linux laptop and compile the version for the touchscreen without having to change a line of code. To my surprise, this worked amazingly. In fact, I even use the Windows version of my program when I'm too lazy to get up and use the touchscreen in some rooms. The Qt framework libraries needed to run Qt compiled applications comes pre-installed on the touchscreen when you receive it. However, it's an old version. I recompiled and updated those libraries to the latest version that was out at the time (4.7.4) so that I could use the newest features. It was a little frustrating to figure out how to do that, but I finally got it to work. LimitationsThe touchscreen does have some limitations. The biggest drawback is that it only has 64MB of ram. For most applications, this won't be too much of a problem so long as you design your program to handle image loading in a conservative way. I've been able to make some pretty graphic-intense interfaces with no problem. A second major drawback is the graphics processing power. Complex animations are not attainable (from what I tried anyway). However, simple animations (especially smaller ones) are. The third, and probably my biggest gripe, is that I have not been able to dim the backlight below about 60%. I can turn it off, turn it on, and dim it to about 60%, all using software control, but nothing below 60%. I would love to be able to dim it to around 30% so that I can keep it on during a movie, but it's just too bright. I end up having the software turn the backlight off during a movie. To turn it on again you just simply tap the screen. Touchscreen Home Automation SoftwareIt took me several months to write the software to control the touchscreen, and to be honest I still change it a lot. Many hours were spent learning Qt and how it works, along with learning how to program in C++ efficiently in the object oriented world. After it was all said and done though, I couldn’t be more happier with the results. The ability to have a custom-developed touchscreen allows for infinite features that no other touchscreen would ever allow me to do. Software FeaturesHere is a run down of the main functions of the touchscreen software with screenshots. The software starts automatically upon bootup and tries to connect to the main controller running MisterHouse over the ethernet connection where I have written a server that feeds updates to the touchscreens. Home ScreenThe home screen is the default screen that loads up. It shows the main category icons along with a shortcut to the live security camera interface and a button to turn the backlight off manually in the bottom left corner. At the top right there is a clock synchronized to the main controller clock followed by the outside temperature, mailbox status (currently empty and checked), and a [C] that shows the touchscreen is actively connected to the main controller. All of the buttons on the touchscreen provide audible feedback with a faint 'click' noise generated by the internal PWM speaker.
The bottom right corner has the shortcut buttons to control the audio (volume up, down, and power on/off) in the current zone that the touchscreen is located in physically. All of the zones can be turned off in the house by holding the bottom right speaker down for three seconds. Music & RadioThe music and radio category is completely integrated in with the house audio system. Anything you can do on a Nuvo OLED display pad can be done here plus much, much more.
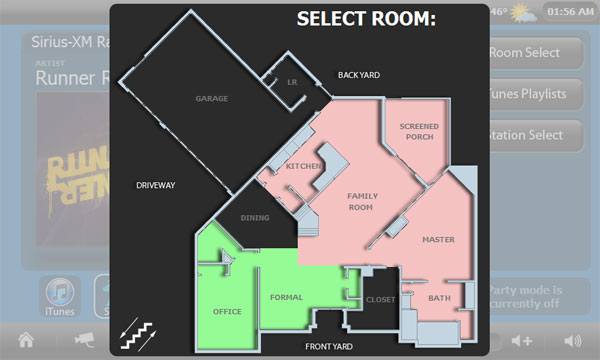
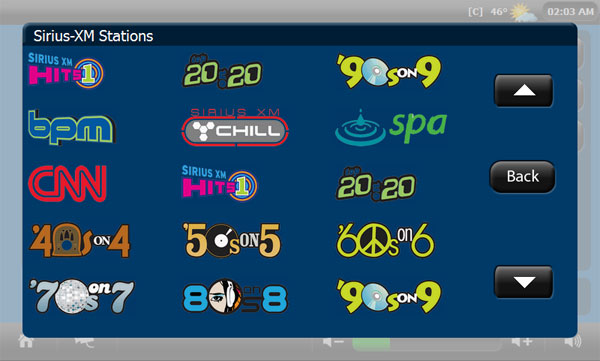
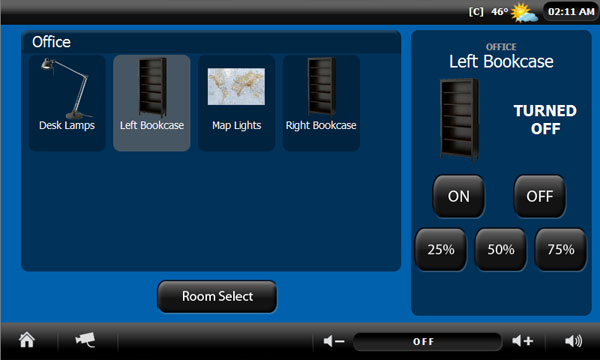
Above: An album cover for Avicii was pulled from Amazon and shown on the touchscreen for the Office music zone. This takes about 2 to 3 seconds start to finish. If a zone is on and set to iTunes, the current artwork for the song playing is loaded directly from iTunes over the network. If the artwork is not available for this particular song in my iTunes library, the main controller searches Amazon for a CD cover image and passes the URL on to the touchscreen to be shown. The same is done for Sirius-XM radio and online radio stations. This is a great feature for guests to look at when you are entertaining. Above: Selecting a zone to control. Notice the two green rooms where the music is currently powered on and the stairs button on the bottom left for switching to the upstairs layout. Each zone in the house can be controlled individually, or if you would like, multiple zones at one time. This is done by selecting the room you would like to control from the house floor plan that I drew to scale. Pressing the stairs button on the bottom left shows you the upstairs layout. In this particular layout, the rooms in green are zones that are currently playing music. Red rooms are zones that are currently off. Black areas do not have speakers and therefore can not be selected in this floor plan view. Multiple rooms can be selected to control simultaneously by holding them down for 1 second. Above: Selecting a new Sirius-XM station to listen to. All of the station logos appear on each page, with my favorites listed first. Selecting a new satellite station to listen to can be done quickly by scrolling through the list of stations available. You can also view all the iTunes playlists available on the media server along with the songs available. Online radio stations are also available here to be selected. Party mode can be toggled on or off by holding down on the party block on the bottom right of the music page. This will allow this touchscreen to control every zone in the house and lock out other users from controlling the audio until it is turned off (a standard feature of the Nuvo). If another zone is the party master, the zone name will be displayed here. Lights & DevicesEvery light, fan, device, and blind in the house can be controlled. Upon clicking on the lights and devices category, the lights and devices fro the room the touchscreen is physically located in are shown. This makes changing a light quick and easy in the room. If you want to control a light or device in another room, you can click the 'Select Room' button and a floorplan will open up for you to select a new room.
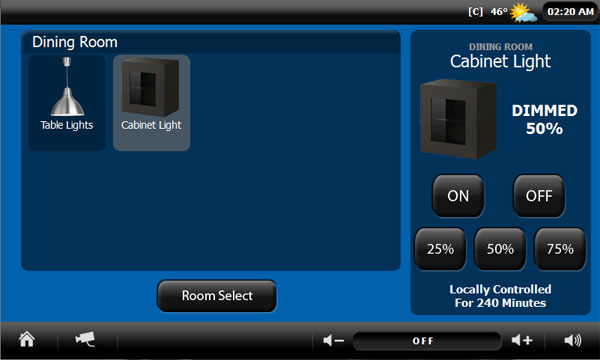
Above: Lights available to be adjusted in the office. The lighting system takes care of all lights and devices in the house automatically, but just in case someone wants to override a light or device, it will show a warning message with the amount of time left in the override. To cancel the override, just hold down on the warning text and it is removed so that the lighting system can take control of the light again.
Above: The cabinet light in the dining room has been overridden with 240 minutes left on the override. Scenes & MoodsThere are three types of scenes and moods in the house. The first are room based scenes. These apply only to a particular room, for example, “late night mode”. In the office this mood happens automatically at 11pm and turns off the back lights on the bookcases and large map when the room is occupied. But it can also be adjusted manually in the scenes and moods category. You can select other rooms using the interactive floorplan button to modify room-specific moods around the house as well. By default the room the touchscreen is located in is loaded first. Above: The general sub-category has been chosen in the scenes and moods category. General scenes and moods apply to the whole house and can be adjusted anywhere so long as you select the general sub-category on the right hand side.
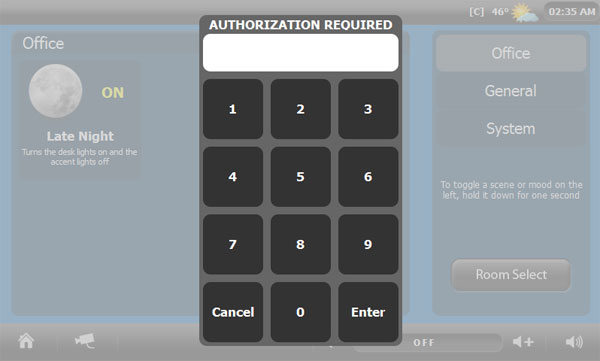
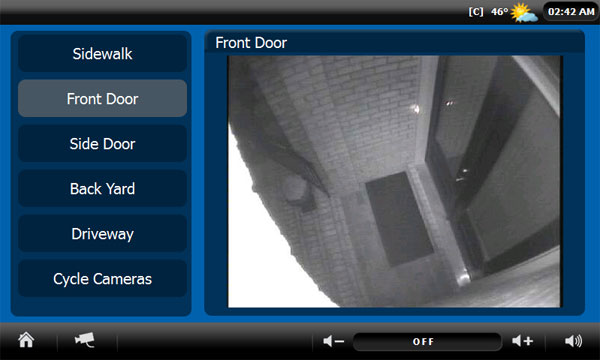
Above: An authorization prompt is being requested to in order to view and modify the system sub-category. All authorizations are submitted to the main controller for verification. System scenes and moods are a protected class and require an override for them to be viewed or modified. This is to keep visitors from playing with things they don't know anything about. Examples of this would be to mute the whole house from speaking or turning off the automatic lighting system entirely so that the Insteon controllers can be reprogrammed. Security CamerasProbably my favorite function of the touchscreens is the ability to view the security cameras live. I am able to get frame rates of about 10 frames per second on all of my cameras around the house. Any action outside the house causes the touchscreens to load up the appropriate camera automatically. Some examples of this are if someone presses the doorbell or the front door camera detects motion, all touchscreens in the house turn on (if the backlight was off) and displays the front door camera for two minutes. If a vehicle driveway sensor detects a car going in or out of the driveway, the touch screens switch to the driveway camera for two minutes. If any of the cameras detect human motion at nighttime the touchscreens will also switch to them. I am currently in the process of creating a record button that allows me to manually record events from the touch screens that are not motion activated.
Above: The front door camera was selected.
|

© Jon Scott 2012 -- All Rights Reserved.