 |
|||||||||
|
Washington, NC Real Estate - A cool site with real estate information in Washington, Bath, and Belhaven, North Carolina. Greenville, NC Real Estate - Another real estate site with information for Greenville and Winterville, NC. Morehead City, NC Real Estate - Another real estate site with information for Atlantic Beach and Emerald Isle, NC. Jacksonville, NC Real Estate - A real estate site with information for Jacksonville, NC and Richlands, NC and homes for sale. |
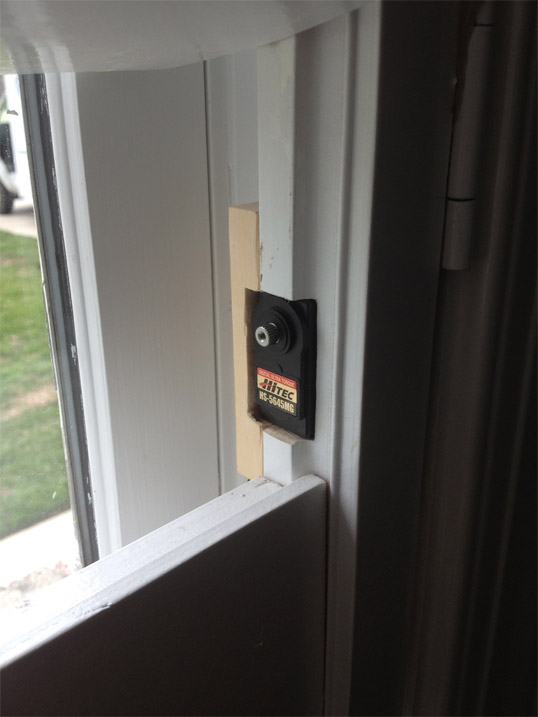
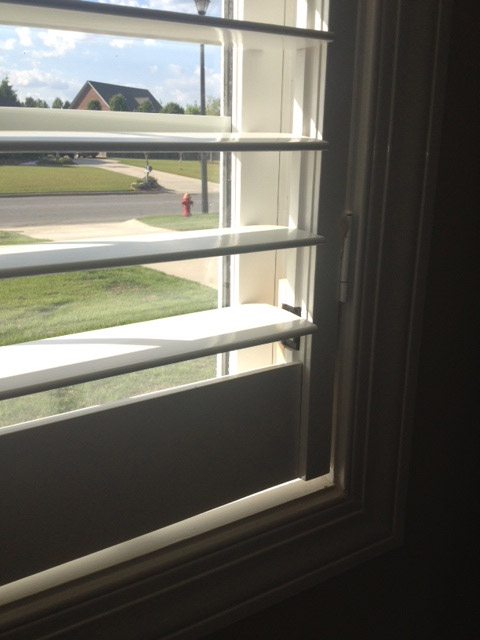
Motorized Plantation ShuttersThe home I bought has eleven indoor plantation shutters that were custom built for the windows on the front – some very large – to make fancy blinds for privacy. Every day I have to close them for the nighttime and open them back up again in the daytime. The three plantation shutters in the master bathroom are located right over a very large whirlpool tub, which means I have to step in it to open and shut them every time I wanted privacy – even to take a shower. Because of all this hassle, the plantation shutters were a prime candidate for automating. Video of initial testing before running the wire to crawlspace and adjusting speed/sound The problem I ran into was that there were no commercially available plantation shutters (that I could find) with motors installed in them. Even if I could find them, I knew it was going to be incredibly expensive to have all eleven of these custom made and installed again. And even then they probably can't be controlled by a computer the way I needed them to be. So I set off on a journey to make my own custom modifications that would allow me to motorize my existing shutters. To make a long story short, I settled on the idea of using a servo motor on each one of the plantation shutters that would allow me to rotate the slats up to 180-degrees with complete precision and accuracy. The wiring for each one of the motors would be run directly down through a small hole drilled in the window sill and into the crawlspace. From here it connects to a custom servo controller node that I designed. The plantation shutters are still easily moveable by hand as the servo motors rotate freely when not powered and moving. About the Servo Motors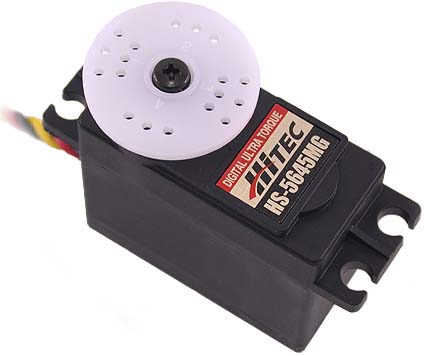 I settled on using the Hitec HS-5645MG Digital Servo motor to rotate the plantation shutter slats. This little beast has 168 ounces/inch of torque when operated on 6 volts. My tallest plantation shutter has 21 slats connected by a center rail and one servo motor rotates all of them with ease. Because it's digital, it has the ability to be programmed. This allows me to set the limit positions (maximum up, down, and center positions) for each individual motor. It also allows me to select the default direction (clockwise or counter-clockwise) and rotation speed. This makes it perfect for my application. The dimensions of the servo motor is 1.59” x 0.77” x 1.48”. It fits almost perfectly within the side of each plantation shutter so that it is almost completely hidden. And best of all, the price of each servo motor is about $45.00, making it an extremely affordable solution. 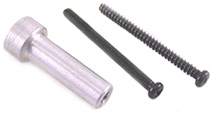 I also had to find a solution for connecting the servo spine to the first slat on each of the plantation shutters so that the motor could rotate it. After a bunch of trial and error, I finally settled on using a Hitec 1/4” Servo Shaft. They are expensive considering what they are ($10/each), but it does work. More information on how to connect the shaft later on. Installing the Servo MotorsThis was complete guess work at first, but after the first one it was quick and simple to install each one. I'll outline my method of installing the servo motor on the plantation blind below, however, please be aware that I am a novice hobbyist and I might not do things the proper way a professional would do them. With that disclaimer aside, here is how I did it:  Step 1: Remove the Shutter – The obvious thing to do first is to take the plantation shutter off the window by unscrewing it and laying it across two sawhorses. Identify the area where the servo will be installed. I chose to mount mine on the side facing the street and next to the hinges. This way the trim around the window pane will hide any glimpse of the servo motor from outside and the wire can run straight down through a small 3/8” hole to the crawlspace. This also allows the plantation shutter to be opened freely without pulling on the wiring at all. Right: Plantation shutter that was just taken down and laid across sawhorses
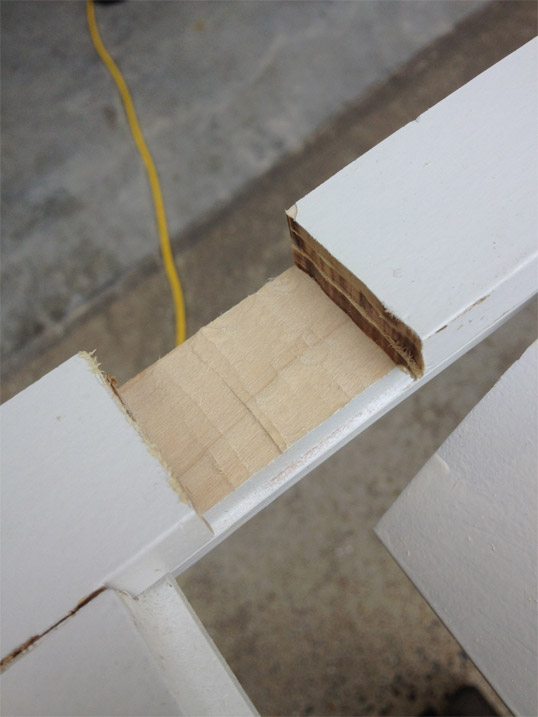
 Step 2: Cut the Existing Shaft of the Bottom Slat – I then took a small hand-held hack saw and cut the shaft/axle of the bottom slat on the side next to the hinges being very careful not to scratch the wood. Once it is cut, it was easy to move this slat over (even while connected to the center rail) so that I could work in this area. Right: Old shaft/axle was just cut and removed from the bottom slat Step 3: Draw the Template – Next I created a template of the servo casing in SketchUp so that I could trace it onto the edge of the plantation shutter. It is important that you figure out where the center of the servo spine will rotate and align it perfectly with the hole where the bottom slat was connected. This way when the servo motor is eventually inserted into the plantation shutter it will line up with the bottom shaft and rotate correctly. Step 4: Route the Template – This is the interesting part. The servo motor needs to be recessed into the edge of the plantation shutter so that the servo spine will line up with the rotational axes of the bottom slat. To do this, you will first need to figure out the distance from the edge of the plantation shutter to the center of the old hole used as a shaft for the bottom slat. I used a digital caliper I bought on Amazon and I honestly can not say enough good things about having this thing around. Anyway, once you figure out this distance, you can then figure out how deep you will need to route to fit the servo motor in. For the routing, I used a Dremel Trio because of its small size and maneuverability in small spaces. It works great for this purpose and it already comes with a circular routing bit that works perfectly. Adjust the depth of the circular routing bit on the Dremel Trio and route out the rectangular template you drew onto the plantation blind. Once you have the desired depth, you will need to lay the servo motor across this new gap you made and trace around the “winged” ends on both sides of the motor. These wings will allow the servo motor to sit into the recessed hole of the plantation shutter you created with very little movement. Once you have traced the wings onto the edge, fit the Dremel Trio with the plunge drill bit that came with it and make sure that it is the same depth as the rest of the template you already routed. This bit will allow you to route a very small line where needed. Route out a small triangle (the wings have a little lip to them on the spine side) on the top and bottom of the rectangle. You will also need to route out a small space at the end for the wire pigtail that extrudes from the servo casing. Once this is done, the servo motor will fit down in the hole firm and snugly. The only way the servo motor can move now is up and outward – the opposite way it was put in.
Step 5: Create the Cover – Because my plantation shutters are not that deep, the back side of the servo case extrudes about 1/8” above the flush line of the plantation shutter. I had already planned on creating a “cover” that I would attach on this side to keep the servo from falling out of its resting hole, so I just decided to draw the template on this cover and route out 1/8” so that it would fit flush along with back of the plantation shutter (like a cap). The cover is just a piece of lumber that I cut down to be 3.5” long, 1.5” wide, and 1/2” thick. After I routed out my 1/8” hole to fit over the casing, I then drilled two small holes on the end of the cover into the plantation blind and screwed in two 1” wood screws. This should also give the edge of the plantation blind a little more stability and sturdiness since I did just route out 0.6” of material from the edge, making it thinner.
Step 6: Attach the Shaft – Now we have to attach the shaft adapter we purchased separately for the servo motor to the bottom slat of the plantation shutter. The long part of the shaft is 1/4” in diameter and the thick part is 3/8” in diameter. First, you need to drill a hole into the bottom slat using the 1/4” drill bit and make sure it 1” deep exactly. Next, you need to drill the top portion of the shaft so that it can be sunk down as well. Using a 3/8” drill bit, drill only a quarter of an inch deep – just enough for the top of the shaft to be sunk into. Be careful if you test placing the shaft in this hole, it can be hard to get out. Once you have the hole drilled correctly for the shaft, the next step is to take a small hack saw and scratch up the surface of the shaft. This will ensure that our epoxy grabs hold of the shaft and forms a strong bond. Make sure the entire thing is rough to the touch without butchering or compromising the strength of the aluminum shaft. Once this is done, use a tiny drill bit to poke around in the hole you drilled in the slat to make sure all of the saw dust and loose wood chips are cleaned out. Finally, mix together a very small (dime size) amount of JB Weld steel epoxy in a plastic cup. You can get this epoxy from any local hardware store for a reasonable price. After mixing the two together, quickly use a small toothpick to layer the inside of the hole you drilled in the slat with the epoxy very liberally. Place the shaft into the epoxy-filled hole and use a hammer to lightly tap it down so that the top of the shaft is just barely extruding from the hole. Wipe any excess epoxy away quickly, making sure it does not get into the gear connection portion of the shaft where the servo spine connects.
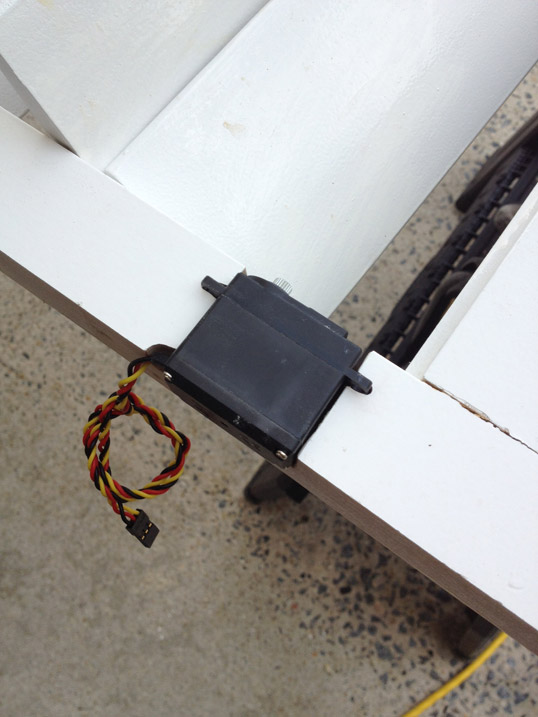
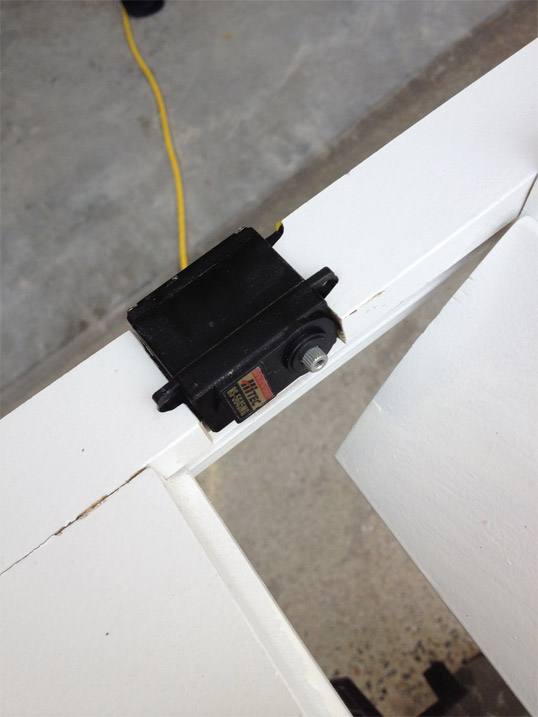
Step 7: Attach Shaft to Servo – Using one of the servo arm attachments that came included with the servo, find the middle of the servo shaft or the “center position”. The servo will only rotate about 180 or 190-degrees, so adjust the arm by taking it off so that it points in the center (90-degree) position. This will make it easy to attach the bottom servo slat to the servo spine. Carefully turn all of the slats on the plantation shutter including the bottom slat that has the servo shaft epoxied in so that they are perfectly horizontal (a.k.a. the center position). Now remove the servo arm attachment from the servo motor that was in the center, 90-degree position and, without turning the servo spine, connect the servo spine to the shaft on the bottom slat that is also in the center, horizontal position. Once connected, carefully place the servo motor into the recessed hole and attach the cover using the wood screws. You can (carefully) test the rotation now by hand if you want, but I recommend you wait until the epoxy hardens. The epoxy will need to cure overnight before the slat or servo motor can be put to use. Step 8: Test and Program – Carefully test the rotation of the slats by hand to make sure that you set the servo spine in the correct position so that the plantation shutter slats can rotate the complete +/- 180-degrees needed to open/close. If the motor is not aligned perfectly, unscrew the wood cover and realign the bottom slat with the servo spine until it is correct. The last and final step is to program the servo motor so that it knows its upper and lower limit positions, center position, default rotational direction, and speed. I use the tiny Hitec HPP-21 Servo programmer that connects via USB to program each servo. The software provided will walk you through on how to set all of these perimeters easily.
You can also paint the cover and the servo casing as I did after these pictures were taken. Once they were painted white, you can't even notice there is a tiny servo motor installed on the shutter at all – inside or outside.
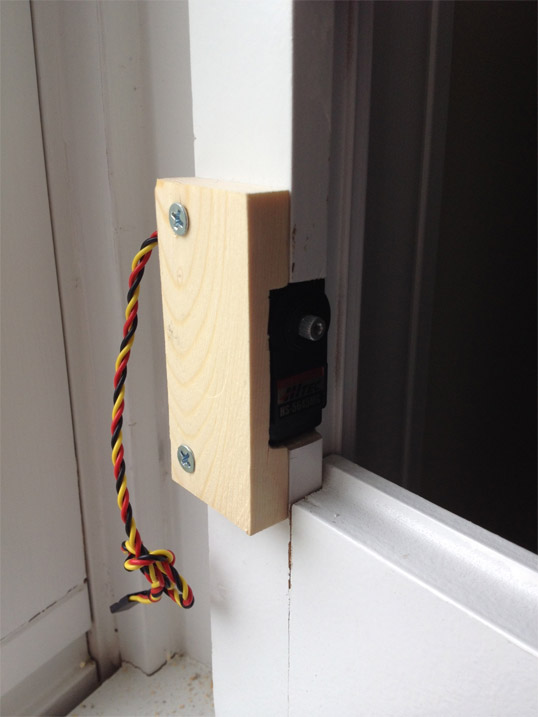
Continue on reading about the servo controller node here.
|
||||||||


© Jon Scott 2012 -- All Rights Reserved.