 |
|
|
Washington, NC Real Estate - A cool site with real estate information in Washington, Bath, and Belhaven, North Carolina. Greenville, NC Real Estate - Another real estate site with information for Greenville and Winterville, NC. Morehead City, NC Real Estate - Another real estate site with information for Atlantic Beach and Emerald Isle, NC. Jacksonville, NC Real Estate - A real estate site with information for Jacksonville, NC and Richlands, NC and homes for sale. |
Climate Control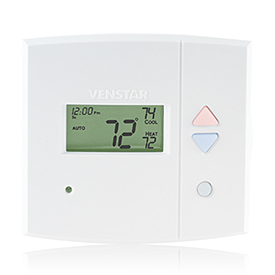 My house has two HVAC units, one for downstairs and another for upstairs. I looked at several controllable thermostats and I ended up going with two identical Smarthome 2491T1 Venstar Insteon Remote Control 1-Day Programmable Thermostats (also available on Amazon here). I did look at some other thermostats that were RS485 controllable, but they were quite a bit more expensive. The Venstar theromostats look modern and stylish, which fits my house better anyway. There is a more expensive 7 day programmable model that Smarthome/Amazon also sell, but I don't plan on using the built-in programming since MisterHouse can control the thermostat more efficiently. The plug-in Insteon adapter on the bottom of the Venstar thermostat is what actually allows you to control the thermostat. Some of the newer thermostats actually have the adapter built-in (look for the thermostats that say Insteon Integrated). You can control and query the heat set point, cool set point, program status, and fan status. The latest Insteon adapters (version 2.0 and above) transmit the current room temperature back to the main controller automatically along with any local changes made at the actual unit. This is handy for allowing the main controller to be overridden just by changing the temperature at the thermostat. How I Use the ThermostatsThe main purpose for the thermostats is the ability to be able to change the heating and cooling set points based on different conditions inside and outside the house. The thermostats are adjusted based on the following conditions:
Outside Climate MonitoringI monitor the temperature, humidity, and brightness levels outside using a Multi-Purpose Node that is located in my attic. A probe wire made up of Cat5 extends out into the roof overhang and pokes very slightly through a small hole. At the end of the probe I have a LM34 farenheight temperature sensor and a HIH4010 relative humidity sensor. Measuring the Outdoor Brightness Level  The outdoor brightness level is measured using a small 200kohm photocell soldered to the end of a small, two-wire probe pushed through a small hole in my attic overhang, pointing down towards the ground. This allows the main controller to turn lights on in specific areas of the house when it is extremely cloudy outside. For example, the garage overhead light is set to come on during the day if someone is in the garage and the brightness level outside falls below 55% for more than two minutes. When the brightness goes back up past 60% for more than two minutes the lights will go off, or if garage becomes unoccupied. Right: 200kohm photocell before it is soldered Knowing the brightness level outside also allows me to adjust my nighttime and daytime modes based on the weather outside. Before this I had the main controller change the house to nighttime mode only when it got to the time of the sunset that day. This worked fine except when it was cloudy or rainy outside and therefore it became dark in the house well before sunset. Now I have the house set to switch to nighttime mode if it is after 4pm and the brightness level falls below 40% for more than five minutes outside. The house switches to daytime mode if it is after 6am and the brightness increases above 40% for more than five minutes. This allows me to account for cloudy afternoons and cloudy mornings.
|
© Jon Scott 2012 -- All Rights Reserved.