 |
|
|
Washington, NC Real Estate - A cool site with real estate information in Washington, Bath, and Belhaven, North Carolina. Greenville, NC Real Estate - Another real estate site with information for Greenville and Winterville, NC. Morehead City, NC Real Estate - Another real estate site with information for Atlantic Beach and Emerald Isle, NC. Jacksonville, NC Real Estate - A real estate site with information for Jacksonville, NC and Richlands, NC and homes for sale. |
Security SystemBecause I don't want to rely on a software based security system, I opted to use a DSC PowerSeries 8-32 Zone Control Panel PC1832 to handle all of my motion sensors, door/window contacts, and glass break detectors. This particular security system is a hybrid and allows you to use hardwired sensors and/or wireless sensors. When I was choosing a security system, one of my main requirements was that it had to have a RS232 serial interface so that it could report back to the main controller all of the sensor status updates. These updates are used by MisterHouse to perform different macros in a very complex way. For this security system, I installed a DSC IT-100 Bi-directional RS-232 interface that works seamlessly. I can even have MisterHouse arm or disarm (using a PIN code) remotely. This is very handy for when I don't feel like getting up to arm the alarm when I'm already in bed. I simply arm the security system using the web interface on my iPhone. 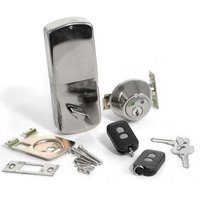 Automatic Door Lock 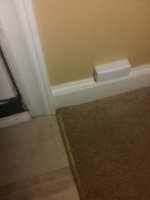 I've been thinking about ways for MisterHouse to detect the status of the deadbolt for a while. This would allow the main controller to know if it should attempt to lock the deadbolt, and after the attempt to lock it was made, whether or not it succeeded. There have been cases where the batteries get weak or the door isn't quite latched all the way and MisterHouse will think the door locked successfully when it actually didn't. This sensor would prevent that from happening. Parts List
- Honeywell 955 Recessed Tamper Switch - DSC Wireless Door Contact Sensor - WS4945 - Soldering gun and solder - Simple wire snake or fishing wire - Any 2 conductor wire
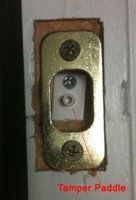 Installing the whole thing was pretty straight forward. I drilled a 1/2 inch hole just far enough for the tamper switch to rest in, then I went the rest of the way through with a smaller bit so that the wire would fit through. I then drilled a 2 inch by 1 inch hole at the bottom of the floor, right above the baseboard. This is where I installed the actual wireless door sensor. I ran the wire behind the wall, straight down, and then back out through the 2"x1" hole I made. It took a few attempts with the wire snake to get from the door jam to the hole on the bottom because of the insulation on the exterior wall, but it finally made it with some wiggling. The wireless door contact sensor screws directly over the hole so it makes everything look neat and professional when it's all finished since there are no wires exposed. I soldered the tamper switch lead wires to my 2-conductor alarm wire just to make sure they have a good contact and don't pull apart in the wall over time. Because the tamper switch is a tad-bit bigger than the actual hole it fits in, I had to cut off one of the screw holes with a pair of pliers. Once this was done it fit right in. I took a spare screw and screwed it down just to make sure it didn't move. |
© Jon Scott 2012 -- All Rights Reserved.